This past week I decided to tackle the AWS Cloud Resume Challenge by Forrest Brazeal which involves deploying my resume into the cloud using AWS resources.
In today’s world, Continuous Integration and Continuous Deployment (CI/CD) have become essential practices for delivering high-quality software quickly and efficiently. In this blog post, I will share my experience building a CI/CD pipeline for the Frontend of my AWS Cloud Resume.
What is Continuous Integration?
CI is the practice of automating the integration of code changes from multiple contributors into a single software project. For this project, this will be the process of every time we perform code changes to our front-end code which will trigger a build process of our site.
What is Continuous Deployment?
CD is the practice in software development where code changes to an application are released automatically into the production environment. For this project, this will take place once our site is ready to be deployed we will sync our files with our newly created S3 Bucket hence making it public.
Our pipeline will consist of the following three-step workflow:
Build Step: We will execute any building procedures to get our website ready to be deployed into the real world.
Deploy Step: Using Terraform we will provision our AWS resources and sync our front-end source with our newly created S3 Bucket.
Smoke Test Step: To make sure our website is up and running we will use a cypress test to verify the core functionality of our site is good before finishing our CI/CD pipeline.
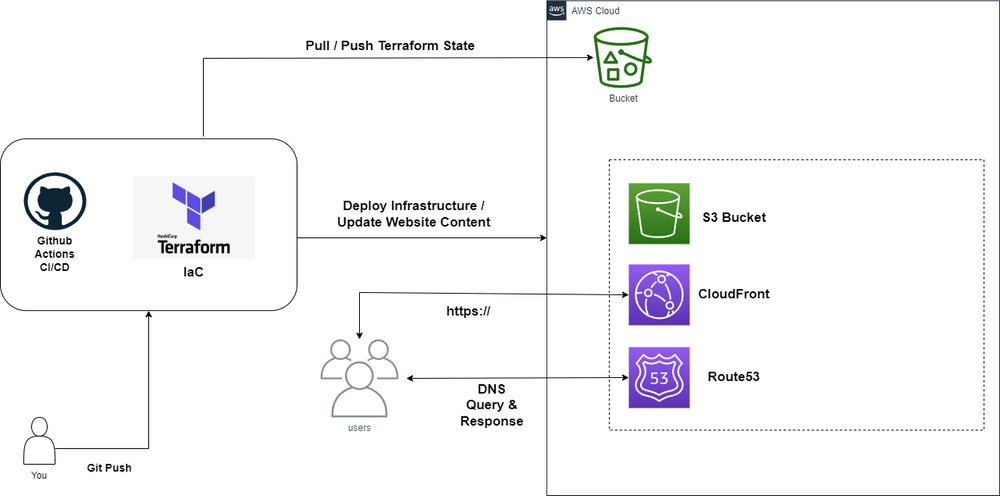
Our infrastructure will consist of the following diagram, it all starts by pushing a new commit into our GitHub repository which will then trigger our GitHub Actions to execute our CI/CD pipeline, Terraform as part of our deployment step will then proceed with provisioning our AWS resources into the real world, and syncing our front-end code into the S3 Bucket with website configuration enabled to host our static site.
As you can see the only resource that is static will be the S3 Bucket that holds our Terraform state file, since we are using Github Actions to provision our resources a remote backend is necessary.
With that being said, let’s get started. We must convert all our AWS resources into Infrastructure as Code this includes our S3 Bucket with website configuration enabled, next we have a CloudFront distribution for our S3 Bucket to redirect HTTP traffic to HTTPS, and last but not least our Route 53 Alias record that will point our subdomain, in this case, https://resume.madebyfrankely.com/ to our CloudFront distribution.
resource "aws_s3_bucket" "site" {
    bucket = var.site_domain
}

resource "aws_s3_bucket_website_configuration" "site" {
    bucket = aws_s3_bucket.site.id

    index_document {
      suffix = "index.html"
    }
}

resource "aws_s3_bucket_acl" "site" {
    bucket = aws_s3_bucket.site.id

    acl = "public-read"
}

resource "aws_s3_bucket_policy" "site" {
  bucket = aws_s3_bucket.site.id

  policy = jsonencode({
    Version = "2012-10-17"
    Statement = [
      {
        Sid       = "PublicReadGetObject"
        Effect    = "Allow"
        Principal = "*"
        Action    = "s3:GetObject"
        Resource = [
          aws_s3_bucket.site.arn,
          "${aws_s3_bucket.site.arn}/*",
        ]
      },
    ]
  })
}

# Since we are using an existing hosted zone already we will use the data block
data "aws_route53_zone" "hosted_zone"{
  name = var.mainsite_domain
}

resource "aws_route53_record" "root_domain" {
  zone_id = data.aws_route53_zone.hosted_zone.zone_id
  name = var.site_domain
  type = "A"

  alias {
    name = "${aws_cloudfront_distribution.cdn.domain_name}"
    zone_id = "${aws_cloudfront_distribution.cdn.hosted_zone_id}"
    evaluate_target_health = false
  }
}

resource "aws_cloudfront_distribution" "cdn" {
  origin {
    origin_id   = "${var.site_domain}"
    domain_name = "${aws_s3_bucket.site.bucket_domain_name}"
  }

  # If using route53 aliases for DNS we need to declare it here too, otherwise we'll get 403s.
  aliases = ["${var.site_domain}"]

  enabled             = true
  default_root_object = "index.html"

  default_cache_behavior {
    allowed_methods  = ["GET", "HEAD", "OPTIONS"]
    cached_methods   = ["GET", "HEAD"]
    target_origin_id = "${var.site_domain}"

    forwarded_values {
      query_string = true
      cookies {
        forward = "none"
      }
    }

    viewer_protocol_policy = "allow-all"
    min_ttl                = 0
    default_ttl            = 3600
    max_ttl                = 86400
  }

  # The cheapest priceclass
  price_class = "PriceClass_100"

  # This is required to be specified even if it's not used.
  restrictions {
    geo_restriction {
      restriction_type = "none"
      locations        = []
    }
  }

  viewer_certificate {
    acm_certificate_arn = "${var.certificate_arn}"
    ssl_support_method = "sni-only"
  }
}
Now that we have our AWS resources converted into Infrastructure as Code the rest is simple, now we can start creating our GitHub Actions CI/CD pipeline. Let’s first create a new repository inside our GitHub account which will hold our front-end code including our Terraform files, divide them up into two folders one the front-end code only and the other the Terraform files.
Our repository should look like the following now:

Now I do have two extra folders, one is the backend which you can ignore for now and the next one is the .github/workflows folder which is the folder that will hold our CI/CD Github Actions YAML file. If we hover over to the Actions tab in our repository you will see this
Now I have a few GitHub actions already triggered but this should be empty for you if it’s your first time creating a workflow. Our workflow will consist of the following YAML configuration file -
name: Deploy Infrastructure

on:
  push:
    branches:
      - main

jobs:
  tf_fmt:
    name: Deploy Site
    runs-on: ubuntu-latest
    steps:

    - name: Checkout Repo
      uses: actions/checkout@v2.5.0

    - name: Configure AWS credentials
      uses: aws-actions/configure-aws-credentials@v1
      with:
        aws-access-key-id: ${{ secrets.AWS_ACCESS_KEY_ID }}
        aws-secret-access-key: ${{ secrets.AWS_SECRET_ACCESS_KEY }}
        aws-region: us-east-1

    - name: Setup Terraform
      uses: hashicorp/setup-terraform@v2
      with:
        terraform_version: 1.3.7

    - name: Terraform init, plan and apply
      run: |
        echo `pwd`
        echo "tfpath ${{ github.event.inputs.tfpath }}"
        echo "** Running Terraform Init**"
        terraform init

        echo "** Running Terraform Validate**"
        terraform validate

        echo "** Running Terraform Apply**"
        terraform apply -auto-approve
      working-directory: 'IaC_Terraform'

    - name: Sync S3
      uses: jakejarvis/s3-sync-action@master
      env:
        SOURCE_DIR: './frontend/source'
        AWS_REGION: 'us-east-1'
        AWS_S3_BUCKET: 'resume.madebyfrankely.com'
        AWS_ACCESS_KEY_ID: ${{ secrets.AWS_ACCESS_KEY_ID }}
AWS_SECRET_ACCESS_KEY: ${{ secrets.AWS_SECRET_ACCESS_KEY }}- Configure our AWS credentials
- Setup our Terraform environment
- Initialize our terraform backend and deploy our infrastructure into the cloud
- Sync our front-end code with our S3 Bucket
- Now with our GitHub action pipeline in place any time we push new code into our main branch these steps will take place and we can sit back and relax our site gets deployed by just updating our code, so cool right?
Let’s see in action:
With changing a few lines in our front-end code followed by a git push into our repository hence triggering our GitHub Actions.


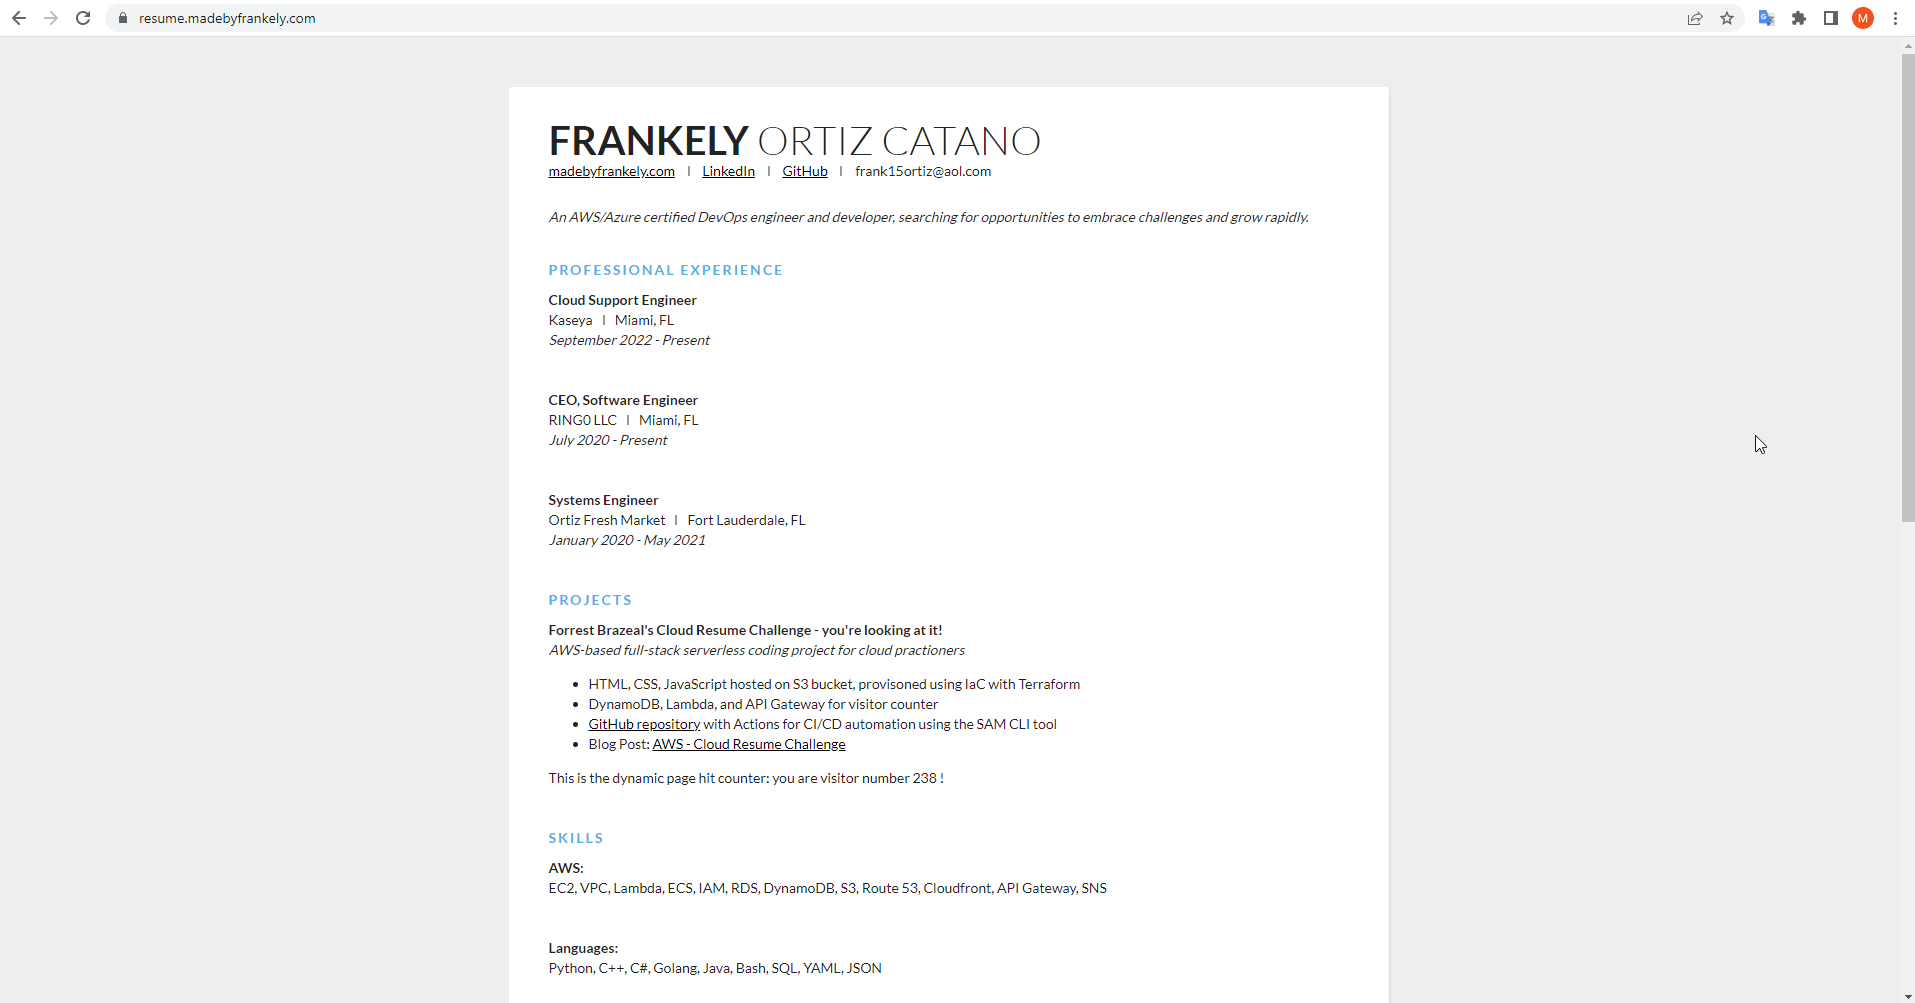
This allows us to also see the progress of our workflow to check how things are being handled behind the scenes. Now once our workflow has been completed. If we try to access our domain using the record we provisioned inside our Route 53 hosted zone we should see our site live.